What Is Sgraffito Pottery?
By Linda · · 8 min read
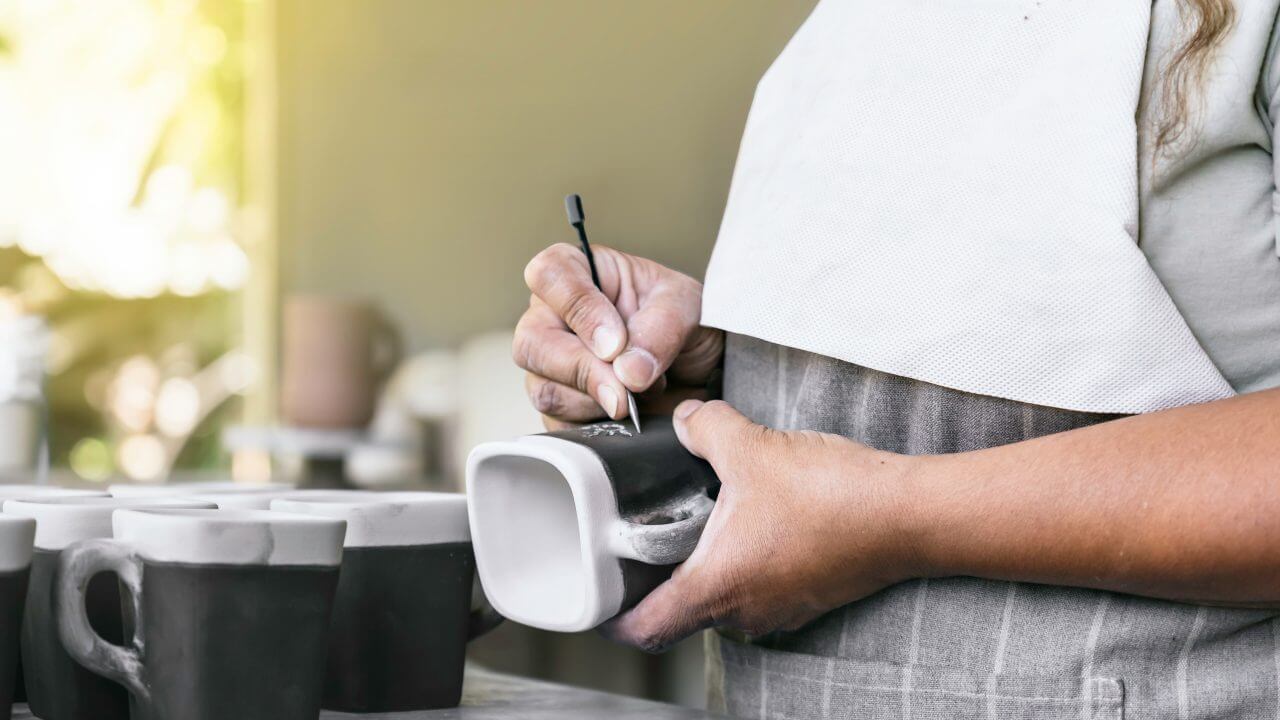
Sgraffito pottery is a ceramic decorating technique in which a design is scratched, carved, or incised through a layer of colored slip or underglaze on leather-hard clay, revealing the contrasting clay body underneath. The word comes from the Italian “sgraffiare,” meaning “to scratch,” and the result is a crisp two-tone design: dark lines on a light ground, or light lines on a dark ground.
It’s one of the most accessible decorating techniques in ceramics. If you can draw with a pencil, you can do sgraffito — the carving tool replaces the pencil, and the slip layer replaces the paper.
What Sgraffito Means in Ceramics
In ceramics, sgraffito (sometimes spelled “graffito”; the plural is “sgraffiti”) refers specifically to scratching through one layer to expose a different-colored layer below. That definition matters because it separates sgraffito from plain carving: if you carve bare clay with no slip on top, that’s incising or relief carving, not sgraffito. The contrast between the two layers is what makes it sgraffito.
The same word is used in architecture for scratched plaster wall decoration. The technique is identical in principle, just on buildings instead of pots.
A Brief History of Sgraffito
Sgraffito is genuinely ancient. Scratched slip-decorated wares show up in ancient China, the Islamic world, and the Byzantine Empire, where potters covered red or buff clay with white slip and carved designs through it before glazing.
A few highlights of the technique’s history:
- 9th–13th centuries: Islamic potters in Persia and Central Asia produced refined sgraffito wares under transparent and colored lead glazes, and the style spread through Byzantine workshops around the Mediterranean. (Lead glazes were standard then; they aren’t food safe, and modern potters use leadless clears instead.)
- Renaissance Italy: the technique flourished alongside majolica (tin-glazed earthenware), and sgraffito plaster decoration covered building facades in Florence and Rome.
- 17th–19th centuries: Pennsylvania German (Pennsylvania Dutch) potters in America made sgraffito redware plates with tulips, birds, and inscriptions. Collectors prize those plates today.
- Today: sgraffito is a staple of contemporary studio pottery, with artists carving everything from loose, gestural lines to tightly detailed illustrative work.
So when you carve through slip on a mug, you’re using essentially the same method a Byzantine potter used a thousand years ago.
The Sgraffito Technique, Step by Step
Here’s the process I teach, start to finish.
1. Make the piece and let it firm up
Throw or hand-build your form, then let it dry to leather-hard: firm enough to handle without denting, but still cool and damp to the touch. This usually takes several hours to a day depending on humidity. Too wet and the slip layer smears; too dry and your carved lines chip and burr.
2. Apply slip or underglaze
Brush, pour, or dip 2–3 coats of contrasting colored slip or underglaze onto the surface. Let each coat lose its wet shine before adding the next. Black or dark blue over a white clay body is the classic high-contrast combination; white slip over red earthenware is the traditional one.
3. Sketch the design
Draw directly on the slip with a soft pencil. The graphite burns away completely in the kiln, so stray lines don’t matter. You can also trace a paper template or just carve freehand.
4. Carve
Cut through the slip layer down to the clay body using a small loop tool, stylus, or needle tool. Aim to remove the full slip layer but only barely bite into the clay, roughly 1–2 mm deep. Rotate the piece rather than your wrist for long curves, and brush away crumbs with a soft, dry brush (never your hand, which smears).
5. Dry, bisque, glaze, and fire
Let the piece dry completely, then bisque fire it, typically to cone 06–04 (1828–1945°F / 998–1063°C). After bisque, glaze with a transparent glaze if you want the design to show clearly, then glaze fire to the temperature your clay and glaze require, commonly cone 06 (1828°F / 998°C) for earthenware or cone 5–6 (2167–2232°F / 1186–1222°C) for stoneware.
Best Clay and Slip Combinations for Sgraffito
Almost any clay works for sgraffito, but contrast is everything. Pick a clay and slip that are clearly different in value (light vs. dark), not just different in hue.
- White or buff stoneware + black underglaze: the most popular studio combination; bold lines, forgiving to carve.
- Red earthenware + white slip: the traditional redware look; warm and rustic under a clear glaze.
- Porcelain + colored slips: beautiful, crisp results, but porcelain is fussier at leather-hard and chips more easily.
- Smooth clay over heavily grogged clay: fine illustrative work needs a smooth body; coarse grog drags the tool and breaks your lines.
If you’re buying materials, commercial underglazes give the most predictable color, while slips are cheaper if you mix your own. I cover typical prices in how much pottery slips cost. Most pints of commercial underglaze run roughly $10–20.
Sgraffito Tools
You don’t need much. A basic sgraffito kit:
- Small loop or ribbon tools for the main line work (the most-used tool by far)
- Needle tool or stylus for fine detail and hatching
- Rubber-tipped or silicone tools for softening edges and fixing slips
- Soft mop brush for sweeping away carving crumbs
Plenty of potters also use ball styluses, dental tools, mechanical-pencil tips, and even sharpened bamboo skewers. A dedicated sgraffito tool set typically costs about $10–30, but a single $5 loop tool will get you started.
Sgraffito vs. Similar Decorating Techniques
People often mix sgraffito up with related slip techniques. Here’s how they compare:
| Technique | How it works | Result |
|---|---|---|
| Sgraffito | Carve through colored slip to reveal the clay below | Crisp two-tone scratched designs |
| Mishima (slip inlay) | Carve lines into bare clay, fill them with slip, scrape back | Fine colored lines inset in the clay |
| Slip trailing | Pipe liquid slip onto the surface like icing | Raised, dimensional lines |
| Incising/carving | Cut into bare clay with no slip layer | Texture and shadow, single color |
| Wax resist | Paint wax to block glaze or slip from certain areas | Soft-edged painted contrast |
Sgraffito and mishima are mirror images of each other: sgraffito removes the colored layer, mishima adds color into removed lines. All of these slip-based methods belong to the same family as traditional slipware pottery.
Common Sgraffito Problems and Fixes
A few things go wrong predictably, and all of them are fixable:
- Chipping and burring along carved lines: the piece is too dry. Carve at true leather-hard, or lightly mist the surface and wait ten minutes.
- Smearing: the slip is too wet, or you’re resting your hand on the carved area. Wait longer between slip coats, and work top-to-bottom so your hand never touches finished carving. I’ve smudged more than one finished line by forgetting this.
- Slip flaking off after carving or firing: the slip was applied too thick or to clay that was too dry. Use thinner coats on properly leather-hard clay, or switch to underglaze, which bonds more forgivingly.
- Design disappears under glaze: an opaque or cloudy glaze covered it. Test your clear glaze on a carved test tile first; some “clears” go milky where they pool in carved lines.
- Mistake in the carving: brush a little slip back over the area with a damp brush, let it set up, and re-carve. Sgraffito is one of the more forgiving decorating techniques this way.
Tips From My Studio
A few habits that improve results fast:
- Carve a test tile first. Every clay-slip-glaze combination behaves differently. One tile saves a ruined mug.
- Vary your line weight. Use a needle for thin lines and a wide loop for bold ones. Designs with only one line width tend to look flat.
- Try multiple slip layers. Two or three colors stacked, carved to different depths, gives a multi-tonal effect you can’t get any other way.
- Save your scrapings. Carved-off slip can go back in the slip jar if the colors match.
- Decide on glaze early. A transparent gloss makes the design pop; leaving sgraffito unglazed on the outside (with a glazed interior for food safety) gives a soft matte look many potters prefer.
FAQ: Sgraffito Pottery
What is sgraffito in simple terms?
Sgraffito is scratching a drawing through a layer of colored slip on unfired clay so the different-colored clay shows through the lines. Think of it as a scratchboard drawing on a pot.
What type of clay is best for sgraffito?
A smooth, light-colored stoneware paired with dark slip or underglaze is the easiest combination. Avoid heavily grogged clay for detailed work; the grog drags your tool and breaks the lines. Dark clay with white slip works equally well. The point is strong contrast.
When do you carve: leather-hard, bone dry, or after bisque?
Leather-hard is the standard and easiest stage: lines cut cleanly with no chipping. Some potters carve at bone dry for a scratchier, chalky line (wear a dust mask, since dry clay dust contains silica). You cannot do true sgraffito after glaze firing, since the clay is too hard to carve.
What tools do I need for sgraffito?
A small loop tool and a needle tool will handle most designs. Dedicated sgraffito sets, ball styluses, and even dental picks all work. Tool choice is personal. Expect to spend about $5–30 to get equipped.
What’s the difference between sgraffito and mishima?
They’re opposites. Sgraffito carves color away to reveal the clay; mishima carves lines into bare clay and inlays slip into them, then scrapes the surface clean. Sgraffito gives bolder marks; mishima gives extremely fine lines.
Do you glaze over sgraffito?
Usually, yes. A transparent glaze protects the design and makes the surface food safe, especially on anything functional. Test the clear glaze first, because some turn cloudy where they pool in carved lines. Decorative pieces are sometimes left unglazed on the carved surface for a matte finish.